Showing posts with label shirt. Show all posts

Tuesday, July 15, 2014

Shirt in a day

On our way downtown to find new
cargo shorts.  I do have my limits.
It's craft show season, so I've been busy at home making things to keep my inventory up.  I tend to wander from project to project, so I don't get bored -- bears one day, dresses the next, potholders on the third day.  Even so, I get a little tired sometimes.

Friday was one of those days.  It was also not too hot, which is good.  My sewing room faces west and in the afternoons it gets somewhere between unbearable and seventh-circle-of-hell.  Friday it was just mildly purgatorial; I can deal with that.  (On really hot days, I retreat to the dining room and cut out masses of projects to be assembled when I can stand the heat.  Yes, I could bring the machine downstairs, but I haven't yet).

So it was comfortable in the workroom, but I didn't feel like working.  Doesn't that figure?  So I decided to clear my head and hone my skills by making Mario a shirt.  Every time I feel like I'm going to fast or getting a little sloppy, I make a shirt.  All that painstaking topstitching slows me down and makes me think about what I'm doing, and why.

He picked out this wallpaper-ish floral a while back at Philadelphia Fabric Outlet.  It's a quilting cotton, technically, and not something I would usually use for a man's shirt, but I don't get as judgmental about short-sleeved summer shirts.  They are what they are, and if I don't have to make cuffs and sleeve plackets with less than cooperative cotton, he can have what he wants.

I'd pre-washed the fabric months ago, when we bought it, but it's been languishing in the living room ever since, in the pile of stuff to be taken into the workroom someday.

I think he likes it!
It made it in, I cut it up, and in 2 1/2 hours, he had a new shirt.  A little slower than my best time for a short-sleeved shirt, but then again, at least an hour less than if I'd had to do cuffs and sleeve plackets.  The collar on this one worked without a fuss -- every once in a while, I get a collar band that just settles onto the shirt like it's meant to be there, but even as often as I've made this pattern (at least 20 times now), I still argue with the collar occasionally.

In case you're interested, the pattern is KwikSew 3422, my favorite pattern to use for him.  Though now that he's lost weight, I think I need to go in a half size for his next dress shirt.  Summer shirts can be roomy; I like a bit more fit in a dress shirt.

Tuesday, February 25, 2014

If I say so myself

The shirt looks almost as good as the man wearing it.

I'm allowed to be a little smug, right?

Smugness aside, I'm really happy with how Mario's latest shirt turned out.  It's been a while since I made one, as was evidenced by my spectacular cutting screwup.  I somehow managed to cut the fronts matching at the fold line instead of the center front itself.  That half-inch or so is just enough to really throw it off, and this print is trippy enough without having the pattern not match.

Thankfully the fronts were the first pieces I cut, and I could simply cut the cuffs and collar pieces from the bad left front and cut a new one that matched.

To make up for the earlier drama, the shirt went together like a dream.  It was probably the easiest collar I've ever done, the cuffs and sleeve plackets gave me no argument at all, and my narrow hem foot didn't eat any fabric.  I used Fashion Sewing Supply's Pro-Woven Super Crisp interfacing so he could have his collar and cuffs as stiff as he wanted them.  (Personally I would have gone a little softer, with this print, but he was a man with a plan).

I did the inside collar band, the undersides of the cuffs and the underside of the sleeve placket in solid gold-colored shirting, and Mario's insistence on gold shirt buttons -- gold metal, mind you, not plastic -- sent us on safari down to 4th Street.  Pennsylvania Fabric Outlet came through, as always, with exactly what he had in mind.

It's not what I would have chosen, but in the end they really did work.  

And he's happy.  He got exactly the shirt that he wanted, so I call that a win.

While we were in the store buying the buttons, however, he came over with another bolt of fabric in his arms.  "What do you think," he said, "of this one for a short-sleeved summer shirt?"

Pretending he's an extra from
"American Hustle"
Who am I to argue?  And apparently shirt-making is good for me after all the production sewing I've been doing recently.  It's good to have to slow down and think about what I'm making, use a few more pins than usual and take my time.  Short-sleeved shirts only having collars to fight with, not cuffs and sleeve plackets, I could probably knock it out relatively quickly.

He wouldn't buy the fabric that day, not understanding the basic logic of "buy it, because it won't be there next time," but I'm going back down to 4th Street next week to meet with someone about a custom teddy bear order, so if it's still there, I'll pick up a few yards.  I may leave the choice of button up to him, since he seems to have developed opinions about these things.  

Saturday, January 18, 2014

New Year, New Shirt

Well, I haven't started the year off the way I wanted to - I'd planned to do a bout of selfish sewing, to clear my head and give me something to talk about here.

After a week-long dredging of the workroom (honestly, you wouldn't believe some of what I found in there; if I'd found Jimmy Hoffa, I'd only have been surprised because I haven't been in the house long enough), I started back in on re-stocking the Etsy shop.  Nice that the inventory went down so low because of the holidays, but on the other hand, the more items in your shop, the more likely you are to turn up in Etsy search results, so restocking was a necessity.

Today we stopped on Fabric Row/4th Street on my way to get my hair cut.  I was almost completely out of grosgrain ribbon, which I need for neck bows for both teddy bears and the smaller knit critters.  PA Fabric Outlet has the best color selection and the best price, and they had a few other things I needed as well.  Why does my house eat small gold safety pins?  Especially when I need them to pin pairs of mittens together?  It doesn't matter; I bought 2 bags.  I also got 4 yards of fusible interfacing, which I sometimes need to reinforce sweater knits (and I'm not using my good shirting stuff for that), and a few other odds and ends.

As I was standing at the cutting table, Mario approached with a bolt of fabric in hand.  "Would this," he asked, "make a good shirt?"


Do you not love a man who doesn't fear color or pattern?  I sure do.  I said I thought so.  He wavered a little, thinking maybe we shouldn't spend the money (it was $4.98 per yard - I also love a man who thinks that's expensive fabric).  I talked him into it, and also into a half yard of coordinating mustard gold for the undersides of the cuffs and the inside collar band.

I asked what struck him about the fabric.  I'm always interested in what he sees, because it's usually not the same thing I get when I look at something.  It reminded him of the intricate textile and drapery designs in a Gustav Klimt painting, which I totally get, though I didn't see it until he mentioned it.  There are even tiny specks of metallic gold and copper in some of the swirls, so it really is reminiscent of Klimt.  If Gustav Klimt made long-sleeved dress shirts with solid gold accent bits.

This fabric is actually in the wash as I write this.  I think starting the new year off by making him a new shirt is a very good thing.

Sunday, February 5, 2012

January 2012: Month End Review


Wow, this was a good start to the new year.  Looking at it as I went, I didn't feel like the month was all that productive, but I realized last night as I looked back, I made 8 pieces, and cleared 16 yards of fabric out of my workroom.  (Plus random pieces of knit that moved to Andrea's stash, but that's not the same as sewing; however, it still frees up more space, so I'm all for it).


First off was the tripleheader tshirt day at Annette's sew-in.  It cleared out space and expanded my wardrobe, all in one afternoon.  With snacks and friends included.  How fun is that?

I also made my Retro Striped Dress, which I really love.  I've only worn it once so far, because it's been a little chilly for skirt-wearing, but I really have to suck it up and wear it again.  It could actually be REAL winter instead of this faux-November thing that's confusing every plant in my garden.

Also in January:  Mario's white-and-black shirt (pictured here because he finally wore it last night), my new jeans, the black Party in the Back skirt, and a knit dress which is finished all but the hem, so I'm counting it as January sewing.  Finish work, so long as it does get finished, can run over into the next month.

While I'm waiting for my first Titanic-era pattern to arrive, I started in on a somewhat late Christmas present for a friend's baby.  She loves something on Sprout called the Good Night Show, and her mother was unable to find her something called a Star Doll.  Could I make one?  Apparently I can, out of yellow bath towels, but now there are terrycloth fuzzies all over the sewing table and all I really want to do is work on something else.  I don't have a great future in selfless sewing.  I was pretty sure of that anyway, but this confirms it.  (Shirtmaking doesn't count as selfless sewing; I get a lot out of that in several ways.) 

Beyond finishing up my dress and this strange stuffed object, and anticipating the trials and tribulations of Downton Abbey era dresses, I'm not sure what's up next on the agenda.  Possibly another pair of jeans, since I have them down to assembly line status now, or maybe I'll start playing with my Fatina dress pattern yet again, because it's going to be the basis of my YSL Mondrian dress knockoff. 

Eventually.

Monday, January 23, 2012

Blinded by the White

If you make shirts for a man long enough, eventually they start to have their own ideas.

"What if you made me a totally white shirt?  A white shirt, but with black buttons and black buttonholes?  And what if the underside of the collar, the inside band and the insides of the cuffs were tiny black-and-white checks.  Could you do that?"

Could I? 

Well, here it is, all finished but the buttons, which I'll sew on tomorrow when I can see straight again.  So I guess I could.

Somehow I had no white shirting in stash, but I actually had the tiny black-and-white check (it couldn't be gingham; it had to be check). 

This, ladies and gentlemen, is why we stash - when totally random requests for tiny black-and-white check come in, we can pull it out of the bin and say, "Is this what you wanted?"

Doesn't that feel good?

Sunday, September 18, 2011

What I did for love

If you sew for others, every once in a while you're going to get a strange request.  Unless you're sewing for someone you care about (or they're paying you a good bit of cash), you can ignore the strange request and go on about your business.

I brought this one on myself. 

Allow me to backtrack and explain.  When I first saw this fabric a few months ago on Dressaday, someone had made it into a dress to wear to Comic Con in San Diego.  Mario would love to go to Comic Con, and I wanted him to see the fabric because he's also a Dr. Who fan. 

How did I know it would be love at first sight?  I could practically hear the violins.  "Can you even buy that fabric?" he asked.  Silly me, I said, "Yes, they have it on Spoonflower.  I could order it."

"And could you make a shirt out of it?"

What was I supposed to say?  No?  To the man who puts up with an absentee sewing wife, and 10 cats, and chickens?

If he wants a Dr. Who shirt, he gets a Dr. Who shirt.  I pull out KwikSew 3422 and order the fabric.

The fabric arrives.  It's even more orange and blue than it appeared in the photograph, and the grid seems even larger.  I'm a little frightened; he's ecstatic.  It is now decided that it's going to be a long-sleeved dress shirt.  In vibrant orange and blue, with a cream grid, and the word "EXTERMINATE" printed in large blue letters.

Again, why not?

Complications arise when I start cutting.  I read Spoonflower's fabric care instructions, I just didn't pay attention to them.  For their quilting cotton, it suggested there might be as much as 7% shrinkage, and it said not to put it in the dryer.  So, after I put it in the dryer . . . it shrunk probably more than 7%, but only in one direction.  I managed to completely warp the print, which made me want to get it right even more.

I got the front and back cut out of the most even portions of the fabric.  The sleeves are cut slightly skewed, but don't look it.  The small pieces, collar and cuffs, were steamed back into straightness and them glued into submission with some of Pam Erny's new Shirt Crisp interfacing.  Love that stuff!

Things really got complicated when I cut out the yokes.  None of the remaining fabric was square enough to work when sewed across the top of the straight grid on the back of the shirt.  I got one so-so yoke, but it didn't make me happy.  Then I got an idea.  An awful idea.  An idea that caused me to drink wine in the sewing room.  You know, one of those ideas.

I went through all my scraps and I cut them up so I had a row of robots, and I pieced them together.  Rather than an uneven, slanted grid across his shoulders, he now had a rank of Dalek robots marching in file, with one lone weapon across his left shoulder.  Brilliance!  (Or at least that's what the wine said).

Yesterday I went to NY for the rescheduled fabric shopping day, and I put myself in a position of having to finish the shirt by telling way too many people about it.  Best way to make yourself do something you're not up for?  Make sure that a dozen or so people will notice when it doesn't happen, and ask uncomfortable questions.

Not to mention the intended wearer of the shirt, who has been following its progress with interest.  Today he got to help out with the finish - because I warped the fabric, I changed the order of construction a bit.  I sewed the sleeves on at the shoulders, and then did the sleeve seams but only to the first grid line past the underarm.  Then I made all the front buttonholes and sewed on the buttons.  Since I had to match text on the center front of the shirt, the most important thing was to get those letters lined up; a slight shift on the side seams - normally the end of the world - would be okay at this point.  So he got to try on the shirt, buttoned and with the side seams basted, to make sure everything lined up. 

I think the sewing gods took pity, I really do.  Everything lined up, and the slightly narrow silhouette caused by a slightly larger-than-usual overlap in the front to line up the lettering, actually works with this shirt.

Best part? HE LOVES IT.  He's wearing it to work tomorrow.  I expect to hear shortly from the lawyers representing his blinded co-workers.

The other best part: this was such an unintentionally challenging project that I'm almost looking forward to making his Hendrix jacket. All notions and lining fabric were purchased in NY on Saturday, but first, there will be a little sewing for me.

Sunday, May 1, 2011

What's black and white and worn all over?

This is Mario's latest summer shirt.  Personally, I find it a little frightening, but he loves it.  

Go figure. 

It's KwikSew 2935 again, which is faster and easier than my standard KS men's shirt pattern.  The collar is a one piece instead of a collar-and-band, which I think is acceptable for a casual shirt, though I'd never do it for a dress shirt.  Only 5 buttons and buttonholes.  It feels almost like cheating, it's so fast.

My favorite part of this shirt (actually, probably the only part I really like) is how well I managed to match the print up the front.  Amazing what taking your time will do, huh?

Not a lot of sewing going on besides finishing the shirt.  I got a call Tuesday at work that my aunt had fallen.  She's 86, so even a minor fall can have major consequences.  She wanted rest that night, so we went up Wednesday after work and she seemed okay - bruised and sore, but able to get around and having, I thought, the sense not to push herself. 

Then the phone rang Thursday morning at 5:30.  Two more falls, refusing to go to the hospital, shoot me now.  By the time I left for work, she had given in and was being taken to the hospital, and I got to do the thing I do best - call people on the phone and pester them into doing what needs to be done.  Talked to the hospital, her doctor, her social worker at the seniors' apartment complex.  Called her stepson in Florida, a couple of friends who normally drop in to check on her.  Only person I didn't talk to was my aunt, who was sulking because I put my foot, and my medical power of attorney, down and made her go to the hospital.

Turns out she has pneumonia, which might account for the weakness that caused her to fall.  She's also got a Hawaiian sunset of bruises up one side, but they're giving her antibiotics for the pneumonia and Percocet for the pain, and it's done wonders for her mood. 

Interestingly, she finally apologized for not coming to our wedding.  Then she blew the apology by saying she hadn't wanted to come in case I didn't go through with it.  Hey, at least she suspected me, not Mario.  Oh, well.  Old people.  What can you do with them?

They're probably going to keep her through at least Wednesday, and then she goes to rehab for a week.  By then they'll be able to evaluate if she can continue to live independently (hopefully she'll regain most of her strength and just need to pay for hourly help when she needs it; the assisted living facility at her complex is obscenely expensive and she would probably outlive her savings at that price - and she doesn't need to worry about money on top of everything else, since she's already a natural worrier). 

We did get up to NYC yesterday for a brief visit.  I did a little shopping with Elizabeth (fabric photos to come - though isn't too much to show), saw the latest exhibit at FIT, met up with Mario for lunch (he was off on his own wanderings in the morning) and took the bus home again in time for dinner.  It was a beautiful day - I think spring has finally arrived.  I think.

Woke up this a.m. with a scratchy throat and the sneezes.  This did not stop me from finishing his shirt, but it may keep me from starting another project tonight as my head is feeling very heavy.

Monday, March 21, 2011

The Good Wife

I re-read my last post. Would somebody get me some wine to go with that whine?

It's Monday. My four-day man-free weekend is over. Can I tell you, it was a little weird? I did enjoy the time on my own, and all that I got done, but it was . . . not what I'm used to anymore.

I know. You can tell me. I'm married now, I'm supposed to like having him around. And I do.

I just still find myself surprised by that fact. It's not a place I ever expected to be, and the last few days have made me realize how grateful I am for the changes that have come my way.

Jeez. I've gone from whiny, uninspired non-sewer to some Stepford version of myself.

Let's try to find a happy medium. Let me tell you about the weekend.

Friday night: I faced down the mess in the workroom. I bagged up some of the mess, which was distracting me, and got down to business. First off, those green cargo pants. I ditched the cargo pockets, recut new jeans-style pockets, and by bedtime (which I admit was a tad later than usual), I had a new pair of Jalie jeans. I'm still not sold on their fly front instructions, so I used the ones from the Ottobre jean pattern. I'm not 100% thrilled with these pants, but I wore them on Saturday.

When I went out with Andrea. We hit the farmer's market, shopping, went to Jomar to fondle fabrics - and acquire a few. We went to 4th Street for lunch and then to look at a few more fabrics. Fabric acquisition was pretty restrained, considering I haven't been to Jomar since PR Weekend back in May. That may be record for me.

They had a good selection of sample cuts from Marc Jacobs. Problem: most of them are 1 yard cuts. I got 3 anyway, 2 sweater knits and a floral knit that will probably become a KwikSew tshirt. Not sure about the sweater knits yet. I also bought 2 yards of knit that are intended for a dress. Last but not least, I bought the shirting cotton pictured here.

I thought it would make a nice short-sleeved summer shirt for Mario. I had no particular intention of making it up right away, but when Andrea dropped me off, I had to do laundry anyway, so I washed all my new fabrics. The shirting dried without a wrinkle, and when I put it on the shelf, I took it right back down again.

This is KwikSew 2935, the same pattern I used recently for my boss's drinking shirt. The details are a lot easier to see with the lighter color. A nice glass of wine helped me with lining up the print on the center front and the pocket placement.

I started the shirt around 9:00 p.m., and finished it all but the topstitching and buttonholes, around midnight.

Sunday I had brunch with a friend, and then went back to her house to watch a BBC miniseries that she wanted me to see. I ran home first to throw in one last load of laundry, and managed to knock out the buttonholes and topstitching too. Then I brought the shirt back to her house and sewed on buttons while we wwatched.

I also managed to get the baby dress hemmed and finished. Photos of that soon - I'm sending it off tomorrow, and since the baby's mom reads the blog (or did, before motherhood probably ate her blog-reading time), I don't want to put the dress up here first.

Picking Mario up at the airport tonight. The shirt will be hanging in his closet when he gets dressed for work tomorrow.

In my world, nothing says, "I missed you, I was thinking about you," better than a new shirt.

Friday, June 18, 2010

Sleeve Placket Tutorial

Because you asked for it. I haven't tried writing out the steps for some of these things before, and for the life of me I can't find the sewing reference I got this from (other than knowing it was one of my old ones), so here goes.

First, your sleeve. There'll be a mark on the pattern piece for where and how long to cut the opening where the placket will be inserted. Note the measurement of the opening, because you'll need it when cutting your placket pieces.

I don't have any set-in-stone measurements for the placket - depending on what you want and where you're going with the shirt, it could vary. It's generally about 6 1/2" long for a man's shirt.

The under-placket will be the length of the opening, plus 1/4". The width can also vary, but I like 1 3/4." Wide enough to make a statement, not so wide it's showy. On a woman's shirt, you could probably go narrower, though I haven't tried it yet.

The second piece, the overlap, is going to be about 2 1/2" wide. As far as height, it needs to be 1/4" higher than the top of the finished placket, which is to say the peak or square over top of the opening, where you stitch to hold the whole shebang together. Another 2 to 3" is safe to work with. If it looks like too much when you pin it, then just shift the excess down to the bottom. You can always cut it off later.

For the overlap, fold it to the shape you want - see the first photo for what I did, which was the point construction. Leave 1/2" of the overlap the same height as the underlap (1/4" will be for the seam and the other 1/4" will be for turning the fabric over the seam). Before pinning the pieces to your sleeve, iron 1/4" seam allowances on the outside of both pieces and the top of the underlap. You won't want to do it after you sew; it'll be a complete pain. And shaping the overlap then will be impossible.

Easy to remember - the narrow underlap is for the narrower part of the sleeve; the wider overlap is for the wider part of the sleeve. For the first step, you're going to pin the pieces to the opening, right sides of the pieces to the wrong side of the sleeve. Stitch 1/4" from the edge and press.

Starting with the underlap, fold it out through the opening and over so that it covers the raw seam you just sewed. Pin it and stitch. The second photo is the the wrong side of the sleeve, with the underlap pressed over the seam, but not yet folded through the opening.

The third photo is the right side of the sleeve with the underlap folded out, ready to be stitched.

Next, on to the overlap. Fold it out through the center (the fourth photo shows the overlap pulled through the center, but not yet folded back or pinned into place over the underlap) and get it settled into position on top of the underlap.

Once you have the overlap secured on top of the under, press it nice and flat, pin it with more pins than you think necessary, and sew the box (or triangle, or whatever) at the top, making sure that you catch the top of the underlap in your seam. The fifth photo is the finished placket from the right side. Go slowly around the top of the placket - it's a little hard to judge the point sometimes, especially with a totally inadequate sewing machine light.

At this point, if you're going to put a buttonhole in the placket, you should do it You can, of course, add the buttonhole after the sleeve is sewn up and the cuff is attached, but there are a few more contortions involved.

The sixth photo is the finished placket from the wrong side. See how neat a finish this gives? I admit, I don't always obsess about the inside of my garments, but since my shirts are usually worn by someone else, I'll go a little further because I expect him to show them off . Besides, he spends a lot of time with his sleeves rolled up and the underside of the placket shows.
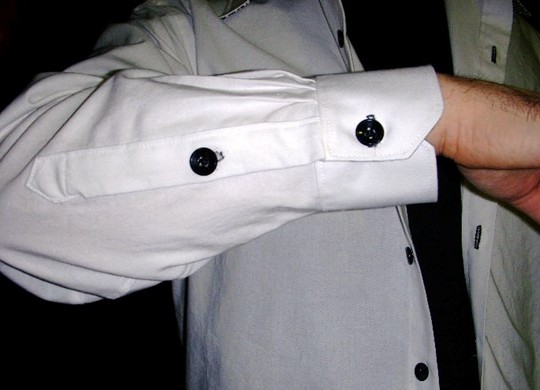
Here's the final shirt sleeve, cuff attached, topstitching done, buttons and buttonholes complete. I copied the pleating detail from one of his Italian shirts, which has 2 pleats on the overlap side and one small pleat on the underlap side. I didn't make my sleeve any wider, just tweaked the size of the existing pleats to make it work.

At the end I've included photos of a shirt I made him several years ago. The outside looks pretty good (though look at that soft and squishy interfacing; that was obviously pre-Pro-Woven) but the inside really shows the messiness at the top of the placket where there's just no way to turn the (cut-on) underlap and keep it flat when you sew on the separate overlap.

I'll admit, this is a longer method than the one piece placket, but it's one of those times where the extra steps give you a better result and actually take less time in the long run because once you get comfortable with this, it goes pretty quickly and if you press and pin everything before stitching, there aren't many ways to really go wrong. The top of the overlap gives a professional, clean finish, and you can personalize it by making it square, diagonal or whatever.

I also like the two piece placket because, as here, I can use two different fabrics. If I were using a stripe, this is where I'd turn it horizontal, or cut it on the bias for some interest.

Let's face it, a man's shirt is a man's shirt is a man's shirt. All that saves it from complete ordinariness is fabric choice and your level of finishing. This is a step up from most pattern instructions, and I feel like it's definitely taken my shirtmaking to another level. I've read quite a few books and every one has their own take on how to do this. While I love David Page Coffin's shirt book and think that overall he walks on water, this is still my preferred way of doing a sleeve placket.

Here's hoping that although long-winded, this makes sense. If you try it, please let me know how it turned out.

Thursday, January 7, 2010

A Tale of Two Collars

When Mario and I went to Florence in October, he bought shirts. Maybe that seems like a silly thing for him to buy, considering how many I make for him, but I was all in favor of it. The man loves shirts; I can only make so many before I get bored, and nice, affordable shirting fabric is hard to come by.

Besides, I was interested in Italian shirts and what - if anything - makes them different from American shirts, so I encouraged his purchases.

The shirts are slim-cut, as opposed to the more classic straight cut that he normally favors. I've measured the difference between his new shirts and his old ones, because even though he always claimed to not like fitted shirts, he likes these better. And they look better on him.

But it's the collars that really got me. The photo at top right is one of his old shirts (old as in thrift store, not as in made by me). But either way, the collar is the same. Straight edge, standard.

The second photo at left is one of his Italian shirts. Look at the shape. The outer curve may look a little funky with a striped fabric, but when it's buttoned, it lays better and has a much nicer fit.

When you look at the two collars together (3rd photo), you can really see how different they are. Not to mention that the Italian shirts feels like its interfacing has interfacing. Those collars and cuffs are stiff - but somehow not uncomfortable. (He'd have mentioned that).

Look at how different they appear buttoned, even just on my cutting table. Sorry, couldn't get my model for this. He'll try on a garment and let me take photos if I'm working on something, but posts for the sake of talking about pattern drafting, he doesn't get.

Besides, he's tired of hearing me obsess about welt pockets and he went upstairs to his office so I could go off to the workroom to practice them without feeling like I was neglecting him. So what am I doing? Stealth typing. Nary a welt pocket in sight.

Do I even need to mention that in addition to noting the changed measurements in the body of the shirt, I've traced off this new and interesting collar and there's another shirt in the works for him shortly. You know how it is - you see something new, you have to try it out, right?

By the way, voting is open for the Menswear Contest over at Patternreview until January 11th. Mario would be thrilled if you cast a vote in favor of "his" jacket, but either way, head on over there and look at some of the fabuluos garments some very lucky men are going to wear this year. Now that we've all finished sewing for them, there's gonna be a whole lot of selfish sewing going on.

Monday, December 31, 2007

The shirt off his back

Okay, last project for 2007: the shirt is finished. I should probably have ironed it before taking its picture, but if I waited to do that, we'd be into January.

This was the easiest one yet. Even the sewing machine cooperated, only grumbling over one final buttonhole (on the sleeve placket, for some reason). I think the machine knew I was bidding on a Viking 770 on Ebay and it might soon be replaced (it didn't realize I didn't win).
How well this shirt turned out stems partly from the fact that it's my fourth one, but also from several other factors: my new toys, a point turner and a buttonhole gauge, two inexpensive items that for some reason I put off buying and which made the whole process much easier. Sometimes it really is the little things that count. Also, David Page Coffin's book on shirtmaking. If you don't have it, you really need to get it. 'Nuff said.

This was a nice change from all the gift sewing I did this year. It got my head back where I needed it to be - thinking about fit, precision, details like top-stitching. The boy says it's time I made something for myself; he didn't realize this was as much about me making a shirt as it was about him getting one, and he doesn't need to realize that.