Sunday, June 30, 2013

Pillows and More Pillows

Some of these have been well on their way to completion for some time - you may remember the Tree of Life motif from over a month back.

Yep, it took me that long to complete.  Don't know why, because when I got in the workroom on Monday to start the piecework for these four pieces, time just flew by and before I knew it, they were done.

The tree and turquoise butterfly pillows have a slightly more constructed patchwork, but for some reason the squared-off pattern just felt right for these.

The pink and orange butterflies were so bright on their own that they really didn't need much accompaniment.  I had an orange remnant (that shirt must be in at least 5 different projects by now), a piece of Hawaiian shirting from a co-worker's vacation and some hot pink scrubs fabric.  The colors are a little "hot" for my decor, but I know they'll appeal to someone.

For some reason, butterflies were on my mind when I made this recent lot of motifs - I've done the single butterfly and dragonfly before, and both have sold, so I decided to repeat the designs and change up the colors.

I kept with the summer colors for the single butterfly - turquoise, lime green and a vintage remnant with a turquoise and green fruit print.  Solid turquoise for the back, because I had a piece in my fabric stash that coordinated.

The butterfly was done in backstitch on this pillow; I generally use chain stitch, which gives a more solid appearance, but this one felt lighter, because of the colors, so I used an airier stitch.


In some respects, the dragonfly may be my favorite.  He's purple, first of all, and while that's not my favorite color, I love the excess it lends itself to - and the patchwork on this one makes me happy because it's so asymmetric and spiky.

The fabrics here are classic green and eggplant purple scrubs, with some class added by a remnant of Liberty of London's "Strawberry Thief" print designed by William Morris.

These pillows, and more, available here.

Saturday, June 29, 2013

Better with friends

Well, not ALWAYS alone.
Meet Lily, sewing room supervisor
We work alone, hunched over our sewing machines, worrying about whether or not our project is going to turn out, if anyone will like it, if anyone will ever buy it.

We work alone.

But there are others out there like us.  We just need to find them.

I got found last week by an online friend, Maria Wulf, of Full Moon Fiber Arts.  She started an open group on Facebook and invited all her creative friends, both real and virtual, to join.  There are quilters and painters and potters writers and photographers and weavers and more.

It's only been a week, but I'm already feeling the benefit of a wonderful bunch of creative people, sharing their projects and talking about their plans.

It's better with friends.

Thursday, June 27, 2013

Lace butterfly vest

To tell the truth, I'm not sure where this piece came from.

Well, I am . . . sort of.  My mother-in-law gave me the tablecloth, thinking I could do something with it.

Me?  Of course I could.  I washed it, and let it marinate for a few days, and then I picked up the scissors.

The tablecloth didn't want to be a tablecloth anymore, it wanted to be a vest.  Or a sleeveless top, however you see it.

Top is fully lined with dusty pink lining fabric.  Back fabric is a lightweight tan/pink paisley tapestry-look fabric (cotton rayon blend, if memory serves).

The buttons are vintage 1960s pink glitter Lucite.  I love them; they remind me of the glitter switchplate in my bedroom when I was a kid.

My favorite part is how well the pattern on the lace lined up - to me the curves on the front look like butterfly wings, hence the name of this particular project.  Available here.

Bad Blogger, Good Giveaway


Somehow I've ended up with two copies of this fabulous sewing reference.

As an apology for my spotty attendance here at the blog, and because I'm trying to keep my rubble under reasonable control, I'm offering my second copy (previously owned by the Chester High School Home Economics Department) for giveaway.

No rules, you don't have to tell me the reason why you want it (though stories are always welcome because they make good reading) - just leave a comment by July 3rd and I'll pick a random entry on the 4th and let the lucky winner know after that.

Keep cool, everyone.

*** Edited to add that, due to budgetary constraints and the price of international postage, the giveaway is U.S. only; if you're outside the U.S. and willing to pay postage, please leave a comment to that effect.

Saturday, June 22, 2013

Anybody looking for one of these?

It's a Greist Circular Decorator attachment for a vintage zigzag machine.

It's not the Holy Grail of buttonhole attachments, but I'm sure it does something pretty snazzy.

I have the Holy Grail buttonhole attachment and rarely use it, so I'm not likely to use this either.  This is still in its original packaging, complete with instructions on the back of the package.

I've got it set as a classified on Patternreview; I was going to put it on Etsy but I thought that PR, Facebook and the blog were more likely to turn up someone who would want this vintage goody.  It's been in a box long enough; it's time for it to go out in the world and help someone make something.

Edited to Add:  I got a question from Miss Kate, "What exactly does it do?"  I guess that's a good question.  I slid it out of the packaging, looking for more answers (as the info on the back really only tells you how to use it, not what to use it for), and apparently the notes and drawings on the front are as clear as it gets.  It can make the scalloped decoration that you see going around the front of the packaging; it's also shown to do scalloped edging on tablecloths and napkins (which have then been cut along the scallops), pillowcases and bedspreads (done more as embroidery; no cutting), the hems of skirts, slips, etc.

The "helpful hints" on front say "Plan your pattern and mark out the centers of all your circles or parts of circles so that each  circle can be correctly centered over the center pin.  While stitching, keep the fabric in front of the needle smoothed.  Do not feed the fabric.  Your circular decorator will guide the fabric into the circle and your machine will feed the fabric.  However, when working on large pieces, guide the fabric under the machine arm when necessary, since the machine cannot be expected to pull a heavy piece of fabric around.  Large pieces should be rolled or folded to get them under the arm."

The instructions on the back are for mounting the attachment on the machine (similar to the buttonhole attachment) and setting the attachment to make the size circle or scallop to fit your design.

I hope this is a little more clear.  I think it's just one of those things that may need experimentation to figure out entirely.


Friday, June 21, 2013

Something completely different

A few years ago, I was "helping" Mario go through his clothes.

You know how that goes . . . if it can't accidentally get destroyed in the wash, some pieces just have to be gotten rid of somehow.

He was very fond of both these shirts, but they were old, stretched out, and sheer in spots.  He didn't want to get rid of them, but even he realized they weren't wearable anymore.

The solution: I cut them up, reinforced the cotton jersey, framed them in a pair of his discarded jeans and then backed them with more cut up denim.

Now they sit on the bed in his office/guest room, he gets to see them all the time and they're out of the drawer.

I'm offering this as a custom order on Etsy, here.

Tuesday, June 18, 2013

What's Black and White

Can you handle another dress?

I almost can't by now, but this one came out of nowhere.  I was tidying up the workroom (which was somewhat of a pit due to my trying to get ready for the show and just generally not picking up after myself, and I happened upon a pair of black and white gingham pants (Ralph Lauren, stained, but very nice) and a black and white cafe print sundress.

These were not purchased together, and last time I saw them, they weren't in the same part of the room.  Do these things migrate when I'm not looking?

Anyways, they insisted on being dealt with right then and there.  Insisted, I tell you.


Since the sundress had piped seams, I couldn't get any really wide pieces from it, so I decided to play with the two prints and alternate them.

The bodice is constructed from the gingham, and the alternating skirt panels are gingham and cafe print.

Because I love my stash of vintage rickrack, I added a wide red waistband and bright red buttons down the back.  Facings are solid black, for contrast and so as not to waste any of the "good" fabric, which will have other uses.

One last red button at the front neckline finishes.

I'm happy with the result, though I'm still not sure where it came from.

Monday, June 17, 2013

(Almost) No Regrets

As I said, the craft show went well.  I sold a few of my embroidered pillow covers, including the one pictured here.

Have you ever sold or given away something and regretted it?  I don't completely regret it -- it went to a good friend who was buying a gift for a good friend of hers -- but I had a real soft spot for this piece.  It's so eye-catching, but that's all it's done since its creation.  It's caught eye after eye, but no one has wanted to take it home.

I think I got used to having it around.

The pillow covers aren't really practical for me to do; since the embroidery takes so long, I really can't charge for as much time as some of these pieces are worth.  But I love to do it, and I would do it anyway, and then I would just have a house covered in random embroidered motifs.  So I continue to make them, and then I edge them in whatever coordinating/clashing fabrics feel right to me.  They're priced for the time it takes to turn them into pillow covers.

Maybe that's impractical, but I don't really care.  Like I said, I'd make them anyway.

And I think I might be making another bird skull sometime soon.

Sunday, June 16, 2013

30th Street Craft Market - Another Show Down

Tent setup - bears front and center
After a week of the most unpleasant weather Philadelphia has to offer (rainy, hot, humid, rainy again, repeat), Saturday dawned bright and clear with no rain in the forecast.

We got to the Porch, a new outdoor gathering area outside Philadelphia's 30th Street Station, around 9:30 a.m.  I was a little nervous about setup as we hadn't test driven my new tent - not having a 10x10 space in which to do it, unless I emptied the dining room.

The tent turned out to be ridiculously easy, and the rest of the setup went smoothly as well.  I was sharing the tent with my friend, Charlene, who makes wonderful one-of-a-kind jewelry sold here.

I thought we would make a pretty good team as we don't make anything that competes with each other, but all our pieces are handmade, recycled and very colorful.  It must have been a good theory, because our tent had steady traffic all day between one or both of us, to the point that other vendors stopped by to see what we were selling!

Me and Charlene
I didn't sell as much as I would have liked (but really, do we ever?) but the table fee was paid before the sale was even officially open, so I felt like that was a good way to start the day.

Three teddy bears, two embroidered pillow covers, a few pieces from the discount bin (discontinued patterns from last year), a few potholders and two baby dresses (with an order for a third).

Five hours in the sun, one slight sunburn (I'm looking a little rosy in the photo, and that wasn't the end of the day) and a decent take, along with the inspiration to come home and make more.

Just not yet.  I woke up today feeling like my tent fell on me, and my sunburn hurts.

More later.

Friday, June 14, 2013

Recipe?


Apparently when one talks about food, one is supposed to provide recipes.

Problem is that one (me), trained by Burda, cooks like she sews - cursory look at the ingredient list, deeper look at what's in the fridge/pantry/garden, heavy sigh, make it work.

So, basil/garlic scape pesto, as best I can describe it:

Take a bunch of garlic scapes (I had about 20; the section of the garlic bed where the stray cat lays hasn't put up scapes yet), cut off and discard the pointy heads, which are the seed pods, and cut the rest into inch long pieces.

Take your basil (in my case, about 3 cups worth - I know this only because I have a 4 cup food processor), put it in the food processor with a good slug of olive oil, and whiz down to a lovely green paste.  Add the chopped garlic scapes, more oil, and whiz again.  I'm not being deliberately vague on the oil, I just add whatever feels right.  This may also depend on how pasty or smooth you like your pesto.

Salt and pepper to taste, whiz.  I know there should be pine nuts or some other nuts in pesto, but I didn't have any, so instead I added a heaping tablespoon of goat cheese.  Not sure how that was a substitute, but it's tasty so who cares?

Lemon juice to taste, then a nice helping of grated parmesan.  Whiz one more time, taste again.

Cook pasta, drain.  Add a little olive oil to the pot, whirl the pasta around in the oil so it's coated and doesn't stick together.

Put your pasta in bowls, add a big dollop of pesto on top, a few grinds of black pepper and another sprinkle of parmesan.  Mix, eat, go back for seconds.

That's the closest I can come to a written recipe, folks.  It's all seat of the pants in the kitchen as well, but other than having to clean the food processor (which is a job I choose not to do), it's quick, easy, requires no cooking and, if you're lucky, you have some left over for another night.

Serves 6, maybe (2 bowls each the first time, probably enough left for another 2 servings).

One glass of wine

I'm not talking about me -- at least not directly.  While I have been known to sip while sewing, the wine-stained tablecloth that provided these adorable dresses was not stained by yours truly.  I picked it up at the thrift store for a couple of dollars, originally thinking I would make a skirt for myself if I couldn't get the stain out.

Well, the stain didn't budge, but I also couldn't work up the interest to make the skirt, so the tablecloth has languished in the fabric limbo for well on three years now.  Last week, I remembered its existence and thought it would be the perfect source fabric for a few more toddler dresses in time for the craft show next weekend.

But then of course I couldn't find it.  I remembered before I reorganized my workroom a few months ago that it had been rolled and shoved into my fabric shelves, but it didn't make it across the room in the move.  I knew I wouldn't have gotten rid of it (when do I get rid of anything?), but where did it go?

A few nights ago I went rummaging in the standing cedar closet in the workroom (otherwise known as the supply closet of doom), and lo and behold, there was the tablecloth!  I was so happy to find it that I pulled it out, shut the door and promptly forgot what I was looking for in the first place.  I still don't remember.

However, the tablecloth has given me four dresses, two in size 1, and one each in sizes 2 and 3T.  I love how the embroidered motif varies from dress to dress, and even more do I love that I was able to take advantage of the scalloped hem of the tablecloth.

I think I can get at least one more dress before I'm out of un-stained fabric, but I might move on to something else for the moment.  Like getting ready for the craft show tomorrow.

More later.

Thursday, June 13, 2013

More backyard goodness

It still hasn't stopped raining.  Today we were supposed to have monsoons all day, starting before dawn.  When I got up at 7:00 and it was still dry, I went out back to get some time in the garden.

This was before I made my coffee.

This is very unusual.  Very.

I fed the chicken, hilled up the potatoes (they're growing like weeds, plus all the rain has been washing the soil back), picked a half pint of blueberries, a few strawberries and then happened to look at the garlic bed on my way back inside.

Yikes.  Last time I checked, the garlic was getting nice and tall, but this morning there were scapes waving all over the place.  Not for long.

Dinner tonight: goat cheese ravioli with backyard basil/garlic scape pesto.

Yum.

That is all.

Today


was National Sewing Machine Day.

I was so busy organizing myself for Saturday's show that I never even turned on the machine.

How's that for contrary?  Give me a day honoring one of my very favorite things and I feel no compulsion whatever to do it.

Tomorrow is another day.  And I feel a project coming on.

Wednesday, June 12, 2013

Shades of Blue

Tis the season - the blueberries are getting ripe.  We've already had a few handfuls from the bushes, way more than the birds have gotten since I wised up last year and spread netting over the blueberries.

It generally means that the strawberries get trashed, but it's a lot easier to get strawberries than the abundance of blueberries that we've missed out on to to the birds.

And speaking of birds, the other reason the berries are so abundant is that when I clean out the deep-bedded chicken coop in March, most of that bedding goes straight onto the berry bushes.  They really seem to thrive on it.

The strawberries actually seem to be holding their own this year, at least so far.  I'm sure I've jinxed them by saying this.

The other shade of blue I've just finished dealing with is a pair of keepsake bears that I made for a friend.  She's donated huge amounts of good fabrics to the cause and passed along her sister's school uniform.  I'd asked several times if I could make something for her, and she'd always turned me down, but she said that her sister was expecting her first grandchild and it would be nice if I could make something from the uniform that could be passed down.

Aside from the fact that I'm on a bear kick lately, I would have probably chosen to do that anyway, because the pieces (a navy wool blazer and a blue, green and gray plaid kilt) just begged to be cut up and made into a bear.

Or two, as it turned out.  When I was almost done the first bear, I realized that it was just too much for an infant, but I didn't want to "dumb it down" and remove the eyes and the National Honor Society pin that had come with the uniform.  So I made a "baby" bear (which illogically is bigger than the first bear).

I handed them over today, and I can't wait to hear the reaction of the grandma-to-be.


The Keepsake Bear Project - Part 4

Today the bears were handed off, on their way to their new home.  My friend promises to call me and let me know her sister's reaction when she sees them.

If her sister's reaction is anything similar to hers, there will be totally age-inappropriate squealing involved.

She was surprised when I pulled two bears out of the bag, and I had to explain my "one for now, one for later" approach, mainly because I got too involved in making this little guy here and couldn't resist putting buttons on his vest, and the National Honor Society pin on as well.  Add the button eyes and you've got five choking hazards on one toy.

The second bear, which I just finished today before we met for coffee, is much simpler, and I just did black embroidered "X" eyes and a mouth and left it at that.

It's going to be more of a pillow than a bear for a while, and then it will be sufficient for the size of the baby.  Once he/she gets older (and I'm hoping it's a boy, since this seems like a boy bear to me, even though it came from a girl's school uniform), it'll be much more interesting to have the detailed bear and have grandma explain where the fabrics came from.

At least that's my thinking, and my friend was in total agreement.

Photos were taken with my usual crate backdrop, but these bears don't quite fit the "rustic" theme so I gave them a few antique books to hang out with - an educated bear should be able to appreciate them.

And yes, I know this last photo is totally wrong, but I didn't realize just how much bigger the "baby" bear was.

More like my little pony than my little brother.

I'm sorry, I couldn't help it.  See what strange things you come up to when you're organizing a photo shoot with two stuffed animals, three pieces of unattached crate and at least six helpful felines (all of whom photobombed at one point or another, which made the shoot take even longer).

Craft Market on Saturday - fingers crossed that the rains will be over by then.  Good for the garden but not for crafters.

Monday, June 10, 2013

Coming Soon

I know, I know, I have a separate blog for the craft business, but I'm sharing here anyway for those who might not think to check both.

Saturday, Saturday, Saturday - Craft Market at 30th Street Station, June 15th, 11:00 a.m. - 4:00 p.m.

Hopefully the rain will have finally stopped - I have standing water in the back garden now and the chicken is threatening to turn into a duck if I will only let her out to paddle around in the puddles.  "Madder than a wet hen."  I now know where that expression comes from.  Though "miserable" would be a more appropriate word.

The new machine and I have become close pretty quickly.  I had no idea just how loud and clunky the Singer had gotten until Mario mentioned that he could no longer hear me sewing in the living room.  Or the kitchen.  Which means I can also now do late night/early morning stealth sewing without waking our housemate, whose bedroom is right above the sewing room.

I've been working on a few things - for the upcoming show, yes, but I'm planning a little spring something for myself as well.  More to come.

A little something

that I probably didn't need, but Ebay can still, sometimes, be dangerous.  I'm a lot more specific about what I look for these days -- remember the good old days when Ebay was young and postage was cheaper and you could lose hours looking for stuff you didn't need but couldn't resist for that price and then two days later it was on your doorstep?

Yeah, this wasn't one of those purchases.  But I do miss them.

Craft show is this Saturday.  One of the least successful parts of my display last time was the double clothesline where I displayed my dresses.  It was cute, but it was a bear to get the stakes into the ground (rain notwithstanding) and the constant breeze made them flap so much they weren't really visible.

This show is on concrete, so the clothesline isn't an option.  I considered mannequins, but didn't think I could afford them.  (And the thrift store down the street doesn't have any, or I would have asked to borrow them for a day or two).  I debated making my own, basically cutout plywood paperdolls, but I can't find my sander and time's getting too short to cut, sand and paint, especially since it doesn't plan to stop raining until at least Thursday.

Then tonight on Ebay I found these.  They're practically perfect - toddler size, fit 1-4T clothes, on a stand, one black, one white.  They also had "flesh" color, but (a) not everyone's flesh is that color and I don't want to offend a potential customer, and (b) my tablecloths, bunting and signage are all more or less black and white, so I thought one mannequin in each color would be perfect and do nothing to get in the way of the colorful clothes.

The hard part:  I paid for expedited shipping.  They'll be here Friday.  If I'd thought a little more in advance, they would have shipped for almost half that price.  But it's still better than waiting for paint to dry, and finding out on Saturday morning that it hasn't.

Saturday, June 8, 2013

The Keepsake Bear Project - Part 3

I'm almost finished the keepsake bear (photos to come shortly), but I took a brief detour to try out the pattern for the second bear.

The second bear was supposed to be smaller, but somehow that didn't happen.  I have an old Burda envelope pattern that I wanted to test drive, and the critters came in 2 sizes.  I meant to use the smaller size, and when I realized my mistake, I'd already cut a few crucial pieces in the large size.  Not wanting to waste the fabric, I kept on.

This may be as large as the baby, but it could maybe double as a body pillow?

I haven't embroidered his eyes/nose/mouth yet, but other than that, I think he's done.

Despite his slightly overwhelming size, he's kind of cute, isn't he?  '

And he certainly doesn't much resemble a school uniform.

Thursday, June 6, 2013

The Keepsake Bear Project - Part 2

I've been thinking about the Bear Project, and it's gotten slightly larger.

The bear that I want to make from the uniform is my standard 14" bear with movable arms and legs, and button eyes.  I want to use the blazer buttons for the eyes, even though they aren't brass blazer buttons, which would be too cool.  (Would it be wrong to use brass buttons from my stash?  Probably.)

Obviously button eyes aren't a good idea with tiny babies who are likely to gum them off, so I generally offer to embroider simple eyes that can be replaced later with buttons.  What I think I think I'm going to do this time is something a little different.

A second, smaller bear.  A simpler bear.

A first bear, you might say, while the bigger, more elaborate bear sits on a shelf for a while - possibly at grandma's?  I have a pattern for a bear with cut-on legs that I think will work.  There are enough pattern pieces - underside of body, upper side, tail, ears - that I can easily use both fabrics, yet I can embroider basic eyes and mouth and not risk any choking hazards, without sacrificing the best details of the larger bear.

I also think it will give grandma a nice opportunity when her grandchild is older to explain where the bear came from, and that she used to wear those fabrics every day when she went to school.  The child will be able to see the new bear and recognize the same fabrics from the one he/she has had since babyhood.

A good idea, yes?

Tuesday, June 4, 2013

New arrivals

The chocolate, vanilla and strawberry dress is finally finished (the new machine makes beautiful buttonholes) and is listed on Etsy.

As I showed before, this one was made from a pre-pieced skirt that couldn't be salvaged.  I was able to re-use the waist tie and turn it into the cute little bow at the neckline.

To keep it company, I also made this yellow and brown plaid dress.  I'm calling it honeycomb plaid, because that's what the colors remind me of.

This one started out as a plus size blouse with an unfortunate ruffle down the front.  (I took the ruffle width down by two thirds, and it's still a little overwhelming on this dress, but I think in a good way.

The front was pieced and because of the bias, the plaid and the smallest touch of lycra in the fabric, I couldn't get the plaid to chevron neatly.  When the top lined up, the bottom went wonky; when the top and bottom lined up, the middle was completely out of whack.  I had been contemplating re-using the ruffle, and that's what pushed me to finally do it.

The back, on the other hand, chevrons perfectly.  Doesn't that just figure?


Monday, June 3, 2013

The Keepsake Bear Project - Part 1

Since I've started making things from recycled fabrics, lots of people have been giving me their cast-off garments.  I've become a waystation between them and the thrift store; bags will appear on my porch and after I've sorted through them, I take the rest to the store (which is only down the block from me, and thus no hardship).

A neighborhood friend whose mother recently passed away asked if I'd be interested in some clothes when she and her sister cleaned out the house.  Of course I said yes, and she's given me some pieces which will be useful for future projects.

A week or two ago, she gave me some lovely woolen things (a sweater or two, a wool coat) and her sister's school uniform, which was still hanging in a closet at their mom's house.  (My friend and her sister are in their mid 50s, so that tells you how long it's been there).  

I had offered to make something for her from her donations, and she said it wasn't necessary.  When she handed over the uniform, however, she had a suggestion.  Her sister's first grandchild is due shortly, and she thought it would be nice if I could make something utilizing part of the uniform.

"What about a bear?" I suggested.  "Maybe using the plaid skirt for the body, so it looks like a vest, and the blue of the blazer for the arms, legs and head.  I could even put her honor society pin on the front."

She loved the idea, and so do I.  Obviously the pin can't stay on if the bear is being given to a tiny person, but I get the feeling that this bear might spend some time on grandma's shelf before being handed over anyway.

I'm going to document this project so that my friend (and her sister) can see how an old school uniform gets turned into a family heirloom.  

Sunday, June 2, 2013

Getting to Know You

New bears on Etsy.  
Sorry for the radio silence, but my new Brother and I have been getting acquainted.

Due to the heat, I've been staying out of the workroom during the later part of the day (west-facing windows let in so much heat that it can defeat the air conditioner when it's particularly hot).   This doesn't mean I haven't been sewing, just not as much and not as late.

Yesterday I broke open the box and read the manual.  Or most of it, anyway.  This is new for me, but I'm used to Singer and I figured Brother might have a few quirks that I should be warned about.

Which it does, but nothing too unusual.  The bobbin gets loaded in the opposite direction from the Singer.  The automatic needle threader actually works - or did, on the second try.  The needle stays down when the machine stops, unless I reset it to stay up.  Choice is good.  

The buttonhole function is good.  After a few test runs, I put buttonholes on all the pieces I'd had waiting, and they all came out fine.  I could love this machine just for that reason.  

But honestly, back to the manual.  I think if they left out all the "notes," "memos" and "cautions," it would be about 4 pages long.  I worked for lawyers for 30 years, I know people do stupid things and then sue because they got hurt doing stupid things, but on every single page there is at least one mention of "could cause injury." 

Yes, I know if I put my fingers too close to the needle, it could cause injury.  I've done it; it does.  And you know what?  I slapped a bandaid on that puppy and got back to sewing.  

I'll have something to show you soon, I think I'm going to take a glass of wine in there and do some more acquainting myself.  Brother needs to understand about wine and sewing.  And that it doesn't, as a rule, cause injury.

Can you hear me now?

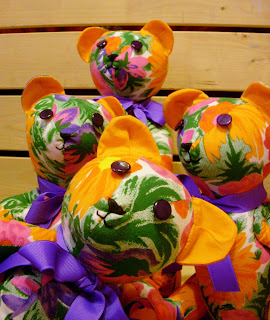
For anyone who could possibly have thought that my Lilly Pulitzer-inspired bears weren't bright enough, I present the Hawaiian tropic series.

I forgot to take a "before" picture of the garment, but it was an unlined cotton jacket (size small, but with near-1980s shoulder pads and a very boxy cut) in shades of bright orange, hot pink, purple and shades of green.  Somehow that jacket turned into 4 bears, with contrasting foot pads and inner ears in solid orange.

Purple neck bows, just because.

Mainly because every other color I tried made my eyes bleed.

They're bright, but somehow, I like them even more than I thought I would.  These bears are for sale on Etsy, here.

Saturday, June 1, 2013

Chocolate, vanilla and strawberry

In my recent post, I showed off a thrift-store find that was going to become a little dress.

Here's the result -- finished all but the little pink buttons down the back, as my new sewing machine and I haven't become sufficiently well acquainted for me to risk mangling cotton lawn while making buttonholes.

There are some scraps left and I'll try the buttonhole attachment out on those before finishing this off.

It's not easy to see in the photo, but I used the waist tie from the skirt to make a tiny bow on the shoulder of the dress.

I'd still wear it, if I could fit into it.